
Tuesday, August 23, 2011
Oliver + S Mother Daughter Tote
I had just enough of the Shangrila print and brown cord left over from Aurelia's Music Class separates to make her a little matching tote. I made this using free instructions from Oliver + S that you can download from their website. I think it would be a little too matchy-matchy to let her wear all three pieces together but the shirt with the tote and jeans would look cute together, no?

Music Class Blouse and Skirt
For the past week or so I've been sewing for my daughter. I started out without much of a plan. I just dug through my fabric and patterns looking for a combination that was cute enough to inspire me to get to work. I came up with the Music Class blouse and skirt pattern from O + S.

I've had this pattern for a while and I've made the blouse once before. I decided to pair up chocolate brown pinwhale cord and a very sweet rose print cotton - both from my stash. The cotton print is by Three Sisters for Moda, from the Sangrila line. The cord I purchased on sale months ago at fabric.com and it has a tiny bit of stretch to it.

The music class skirt comes together in a flash. It is so fun to make. I love how there is a single piece of fabric that you fold to form the pocket and the skirt side panel. I don't like to hem - it is one of my least favorite things about garment construction. And this hem was extra hateful because of the pleats. I trimmed the seam allowance to almost nothing and pressed like crazy and the pleated panels behaved pretty well.

The music class blouse is a great pattern for anyone who has never sewn a placket and wants to learn a new sewing skill. The instructions for the front placket and the button cuff for the long sleeve version are excellent. This is the second music class blouse I made for Aurelia and I have another short sleeve version planned already. I don't really like how quilting weight cotton takes a pin tuck so I decided to do simple gathers across the yoke and sleeve cap instead of the tiny pin tucks. The only un-fun thing about sewing this shirt is the button holes. They are right up there with hemming pleats on my list of hateful sewing tasks. My machine makes terrible button holes. My hand stitched ones aren't much better. I used buttons that I reclaimed from one of my husbands old dress shirts as he was throwing it out.


Obviously I made the skirt and shirt to match but I think that the shirt could easily go over jeans or a denim skirt. It could also look cute under overalls or a jumper. The outfit will work in the warm weather with sandals or later in the fall with tights and a cardigan. Very versatile - as long as she doesn't outgrow it too quickly! Look at this sweetness!

Sunday, August 21, 2011
Anna Maria Horner Free Embroidery Pattern
I just love the posts over at Anna Maria Horner's blog - especially the last couple she has posted about her new Needleworks products. She has released 2 free embroidery patterns to go with her threads (get them here and here). I stitched up the table scarf project that she posted most recently. I used a turquoise cross-weave fabric from my local quilt shop and I backed the scarf with one of the larger scale prints from the AMH LouLouthi line.
I used DMC embroidery floss in colors very close to the Anchor thread colors that are recommended in the embroidery pattern. The pattern called for a large cross stitched border but I decided to try something different. I did two stripes made of running stitches in 2 different colors with tiny little cross stitches every half inch to couch the large stitches down and to hide the place where the running stitches meet.
Now I just need a lovely vase of flowers to sit on top!


Tuesday, August 16, 2011
Modern BOM: August
The Block of the Month for August has been posted over on the blog at SewMamaSew.
This one is an improvisational block and when I saw it I thought it had a pixelated look to it. I chose to modify the actual August BOM a little bit. I took left out the sashing strips at the sides of the block. I used 4 shades of blue and just had at it - cutting strips about 9 inches long and between 2-3" wide. I let the block be as big as it wanted to be and just squared it off at the end - it is 13 1/2" square. The finished block reminds me of an extreme close up of a pixelated photo. Also, the color blocking effect has a kind of 60's feel to it. I really like the way it turned out...


This one is an improvisational block and when I saw it I thought it had a pixelated look to it. I chose to modify the actual August BOM a little bit. I took left out the sashing strips at the sides of the block. I used 4 shades of blue and just had at it - cutting strips about 9 inches long and between 2-3" wide. I let the block be as big as it wanted to be and just squared it off at the end - it is 13 1/2" square. The finished block reminds me of an extreme close up of a pixelated photo. Also, the color blocking effect has a kind of 60's feel to it. I really like the way it turned out...

While I was waiting for the August BOM post I made some of the modern log cabin blocks that are in the first chapter of Block Party.


These log cabin blocks were really fun to make - no measuring just slash and sew! I liked the effect of the blue block alot - much better than the green and pink block with contrasting colors. I liked it so much I used all the same blue shades for the August block.
I've been working hard on some garment sewing also. I just finished a skirt for my daughter using the Music Class pattern from Oliver + S. I have a matching blouse all cut out and with the scraps left over I'm going to make her a Mother Daughter Tote using the free tutorial from Oliver + S. With any luck I'll be able to post about those finished pieces in the next few days.
Thursday, August 4, 2011
Modern BOM: July
SewMamaSew is hosting a year-long Modern BOM on their blog and I've decided to try to sew along. Check out the first block for July here. I'm not planning to do an entire quilt with the blocks or anything. My goals for sewing along are just to learn more about quilt block construction and to try my hand at some of the "modern" or improvisational blocks that I see all over the internet. I also want to use each block as an opportunity to experiment with color. I will be able to try out different combinations on a small scale without committing to an entire project - just one block. And it will be a good way to get to work with some of the fabrics in my stash that I love but just haven't found a project for and to use up some scraps. If any of the blocks turn out really well then maybe I'll work them into a quilt or pillows.
If you are a beginner thinking about making the July block you might be put off by the fact that it has 16 pieces. However, I'm a very inexperienced quilter and it took me less than a half hour to cut all the pieces for the block. The block seams are all straight line sewing and the design is such that you can still come up with a nice block even if your seems are not 100% precise. It is a forgiving block if that makes sense.
So here is my block for July using solids in khaki, turquoise and spring green and an orange tone on tone butterfly print from the Nest line by Valerie Wells.

The author of the BOM posts at SewMamaSew is Alissa Haight Carlton a founding member of the Modern Quilt Guild and the co-creator of the Block Party book. The book features 12 modern quilts that are primarily "wonky" and improvisational. You can download a free excerpt of the book here - it is the whole first chapter with instructions for the wonky log cabin block used for the book's cover quilt! I am considering making the log cabin block now to distract me while I wait impatiently for the August BOM post on SewMamaSew.
If you are a beginner thinking about making the July block you might be put off by the fact that it has 16 pieces. However, I'm a very inexperienced quilter and it took me less than a half hour to cut all the pieces for the block. The block seams are all straight line sewing and the design is such that you can still come up with a nice block even if your seems are not 100% precise. It is a forgiving block if that makes sense.
So here is my block for July using solids in khaki, turquoise and spring green and an orange tone on tone butterfly print from the Nest line by Valerie Wells.
The author of the BOM posts at SewMamaSew is Alissa Haight Carlton a founding member of the Modern Quilt Guild and the co-creator of the Block Party book. The book features 12 modern quilts that are primarily "wonky" and improvisational. You can download a free excerpt of the book here - it is the whole first chapter with instructions for the wonky log cabin block used for the book's cover quilt! I am considering making the log cabin block now to distract me while I wait impatiently for the August BOM post on SewMamaSew.
Wednesday, August 3, 2011
Girls top with hand quilted bodice...
I must admitt that I'm finally breaking out of a sewing slump I've been in lately. The warm weather has kept me from wanting to sit at my machine. I've been embroidering and doing very small hand sewing projects - mostly things that can be done while I sit with my kids in the back yard. But a few things came together to inspire me to sew a proper garment - a summer dress for my daughter in cotton voile with a raw hem, hand quilting and flower charms for the back closure.
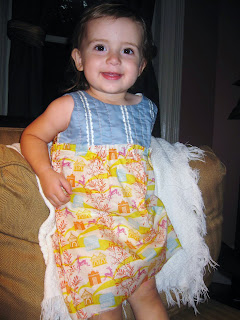
My first inspiration was a book I purchased last month called Carefree Clothes For Girls: 20 Patterns for Outdoor Frocks, Play Date Dresses and More, by Junko Okawa. There is a gorgeous dress in the book made from double gauze with raw edges and a hand quilted bodice.

It is so pretty - I knew right away that I wanted to make a garment for my daughter that would be inspired by that dress. However the patterns in the dress are way too big for her at this point so I would need to get creative with the pattern.
The next inspiration was Anna Maria Horner's recent post showcasing her new line of fibers. I think it was beautiful and you can see for yourself here. I loved the way she put such emphasis on hand embroidery as a component of her sample garments. Really pretty stuff.
The final straw was Gertie's Stitch-Along on the STC Craft Blog. I love reading Gertie's New Blog for Better Sewing and Gertie is doing some guest posts on the STC Craft Blog right now. Her post for this week was on quilting techniques used in garment sewing. She recently posted some very inspirational pictures of beautiful quilted garments. Just the thing I needed finally get me to tackle the dress with a quilted bodice I had been dreaming up for my daughter.
I used the bodice pieces from the O + S Music Class Jumper pattern and just sewed a simple gathered skirt to the bottom edge of the bodice. The bodice is made of 2 different colors of AMH cotton voile with an interlining of white cotton flannel and then a lining of ivory cotton. The skirt was made from a single rectangle of AMH cotton voile with a french seem at one side to form a tube. Then I just gathered it enough to fit the bodice and tacked it on.

For the hand quilting I started by followed the pastry cutter lines of the voile pattern and then added additional "stripes" at random intervals until I was happy with the balance of the lines. I used 2 strands of DMC embroidery floss for the quilting.
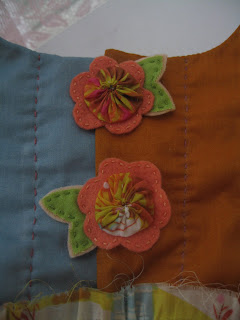
I machine stitched the "skirt" to the bodice with the raw edge facing out so that it creates a little raw-edge ruffle effect. I also left a raw hem which feels a little like cheating but it is in keeping with the rough feel I wanted for this dress. The back bodice closure is done with sew on snaps and then on top of the snap I've tacked a couple of hand made flower charms.
She seems to like it and so do I...


My first inspiration was a book I purchased last month called Carefree Clothes For Girls: 20 Patterns for Outdoor Frocks, Play Date Dresses and More, by Junko Okawa. There is a gorgeous dress in the book made from double gauze with raw edges and a hand quilted bodice.

It is so pretty - I knew right away that I wanted to make a garment for my daughter that would be inspired by that dress. However the patterns in the dress are way too big for her at this point so I would need to get creative with the pattern.
The next inspiration was Anna Maria Horner's recent post showcasing her new line of fibers. I think it was beautiful and you can see for yourself here. I loved the way she put such emphasis on hand embroidery as a component of her sample garments. Really pretty stuff.
The final straw was Gertie's Stitch-Along on the STC Craft Blog. I love reading Gertie's New Blog for Better Sewing and Gertie is doing some guest posts on the STC Craft Blog right now. Her post for this week was on quilting techniques used in garment sewing. She recently posted some very inspirational pictures of beautiful quilted garments. Just the thing I needed finally get me to tackle the dress with a quilted bodice I had been dreaming up for my daughter.
I used the bodice pieces from the O + S Music Class Jumper pattern and just sewed a simple gathered skirt to the bottom edge of the bodice. The bodice is made of 2 different colors of AMH cotton voile with an interlining of white cotton flannel and then a lining of ivory cotton. The skirt was made from a single rectangle of AMH cotton voile with a french seem at one side to form a tube. Then I just gathered it enough to fit the bodice and tacked it on.

For the hand quilting I started by followed the pastry cutter lines of the voile pattern and then added additional "stripes" at random intervals until I was happy with the balance of the lines. I used 2 strands of DMC embroidery floss for the quilting.
I machine stitched the "skirt" to the bodice with the raw edge facing out so that it creates a little raw-edge ruffle effect. I also left a raw hem which feels a little like cheating but it is in keeping with the rough feel I wanted for this dress. The back bodice closure is done with sew on snaps and then on top of the snap I've tacked a couple of hand made flower charms.

She seems to like it and so do I...

Subscribe to:
Posts (Atom)