Saturday, March 26, 2011

Dresden Plate Project, Part 2

I'm still loving the idea of having a whole wall of dresden plate wall hangings.  But mostly right now I'm just enjoying the small hand work of quilting these up.  Here is my second dresden plate.  This one uses fabrics from Amy Butler's Daisy Chain line with some Art Fabrics prints mixed in.  For the background I just used a solid quilting cotton.  The binding and backing are both from the Daisy Chain fabrics. 
The quilting itself is done with 2 strands of DMC embroidery floss in white and light blue. 

Here is a sneak peak of my next dresden plates which are already underway...

Monday, March 21, 2011

Rose Print Shirt: Butterick 5555

Here is Butterick 5555 as shown on the pattern envelope art: 

And here is the version I sewed up.  Hmmm, this shirt fits well but I'm not so sure about the print...


This shirt isn't exactly a wadder, it actually turned out the way I planned it.  But, maybe my plan wasn't such a good idea to begin with.  Sometimes I plan a great garment but my technical sewing skills fail me at some point and the garment doesn't come out as planned.  In the case of this shirt my sewing skills were up to the task but my design skills are what failed me I think. 
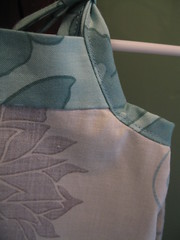
I think it was a mistake to use the large scale rose print for this shirt.  The detailing of the pattern itself gets lost in the print (I can't even discern the belt in the photo above) and I think the print might be too loud for a shirt anyway.
Also, the fabric I used is a quilting cotton.  I make clothes for my daughter using quilting cotton and I'm always happy with the results.  However, I don't have good luck making garments for myself with quilting cotton (with the exception of a couple of simple A-line skirts).  Am I alone here?  Do you make clothes for yourself and if so have you used quilting cotton?  I always see samples of Amy Butler patterns made up in her quilting cottons so people must be doing it.  Other designers like Anna Maria Horner and Valori Wells are adding more substrates to their lines like voiles which I much prefer for garment sewing.  

Here is my detailed pattern review.  Also posted at patternreview.com:

Pattern Description: MISSES' TOP, TUNIC, DRESS AND BELT: Pullover, loose-fitting top A, tunic B, dress C have front gathers, self-faced front yoke, stand-up collar, gathered three-quarter length sleeves with sleeve bands, stitched hems and self-belt. A: above hip length. B: below hip length. C: above mid-knee length.

Pattern Sizing:
I cut a 14.

Did it look like the photo/drawing on the pattern envelope once you were done sewing with it?
Yes.

Were the instructions easy to follow?
Yes. They were easy to follow since this is a simple garment IMO but I'd say the instructions were just average. I think there should have been something to alert you that you are attaching the collar to a partially finished neckline. Also, I don't like how they have you complete the entire sleeve before sewing it to the garment. Whenever possible I like to set the sleeve in flat before sewing the side seam and I find that method much easier with a garment like this.

What did you particularly like or dislike about the pattern?
I like the versatility of the pattern allowing you to choose a length (shirt, tunic or dress). I disliked the fact that there was no long sleeve option.

Fabric Used:
I used a quilting cotton from the Greenfield South line by Free Spirit. It was really substantial. I washed and dried it before sewing and it fluffed up a bit - almost like a flannel but not quite. If that makes sense. I would not use this fabric again for this top. I should have used some cotton shirting - the quilting cotton is a little stiff.

Pattern alterations or any design changes you made:
None. Thought about lengthening the sleeves but didn't have enough yardage for that. I usually need to make an FBA and petite adjustments but neither of those were necessary for this pattern which made this a fun and fast project.

Would you sew it again? Would you recommend it to others?
I would consider sewing it again but this time in a solid color instead of a print. I loved the fit of the finished garment however it seems a little loud with the large, all over rose print. Maybe in a nice lawn, batiste or lightweight shirting. I will consider making this in the dress length for spring.

Conclusion:
For me this shirt is a nice alternative to the usual button down or v-neck that I tend to wear. This is a great pattern for a beginner because it is easy to fit the garment - you won't have to fuss with the fit since it is so roomy and then just cinches in with the belt.

Monday, March 14, 2011

An O+S Weekend...

This weekend my sewing projects included 2 no-tie scarves for my boys and a summer dress for my daughter.  Kind of funny that I'm sewing winter and summer things at the same time.  There is still snow on the ground at our house but I'm obviously ready for the warm weather to get here all ready.  All of these project were made from patterns by Liesl Gibson for her Oliver + S line.  The scarves are from her new book, "Little Things to Sew". 
I used a piece of blue fleece that I have had for a couple of years and I backed the scarves with fabrics from Liesl's City Weekend line for Moda.  Grosgrain ribbon for the "fringe". 

In the picture below on the right you can see how the scarf has a loop in it that allows your child to put it on themselves without having to tie it up.
I posted a review of this pattern here.

The second Oliver + S pattern of my weekend was the Popover Dress pattern.  You can get your own copy of this free pattern here.  Since the dress has such a simple pattern with one piece for the front and back it works well with large scale prints.  I've seen it done up beautifully in more delicate prints too but I love the way my dress turned out in the Del Hi prints by Valorie Wells. 
Dress front:

Dress Back:


Here is a detail of the inside of the dress yoke.  I like the fact that you get a very clean finish with this dress on the inside.  I don't own a serger or an overlocker so I sometimes have to go to alot of trouble to get clean seams and a professional finish on the inside of my garments.  This one was easy.
I wrote a review of the Popover Dress pattern here.
If you haven't tried a pattern by Oliver + S I highly recommend that you give them a try.  You will not find better written instructions in a pattern and there are some very cute modern classics in her line.

Friday, March 11, 2011

Anna Maria Horner, how I love thee... Let me count the ways.

Eight new reasons to love Anna Maria Horner arrived in my mail box yesterday.  Silky, silky soft voiles in a rainbow of colors.  These are my first voiles from AMH and the quality of the fabric is just wonderful.  So soft and fluid.  It is really silky the way Liberty tana lawn is but the voile just has some sheerness that you don't get with the tana lawn.  Without further ado here are my new lovelies:


And see how pretty they look mixed with some of the cottons I already have in my stash from AMH's Innocent Crush line? 


I don't think I could stand to cut these up in tiny pieces so I'm thinking I might incorporate them into a very simple quilt.  If you have a suggestion for a good pattern or a link to a fun project in rainbow hues please leave me a comment!  Okay, show and tell is over now - time for lunch.  ;) 

Thursday, March 10, 2011

Dresden Plate Project...

Over the course of the last week or so I have been inspired by some beautiful and modern dresden plate projects that I've seen online. My fingers were just itching to create a dresden plate of my own. I decided to go with a simple wall hanging using fabrics that I already had on hand. All other weekend sewing went by the wayside while I worked on my dresden plate. Here are the projects that inspired me:
From Raggedy Owl


And this one from Oh Fransson:


I ended up using the tutorial from SewMamaSew here to make my block.  For the "petal" pieces and the binding I used some scraps from Moda's Wonderland line that I had left over from the nursery set I sewed for my daughter's bedroom.  I wanted the petals of the plate to "float" on the background so I used the background fabric for the center circle.  For the background and the center circle I ended up using a silk twill that I had in my stash.  This is an apparel fabric - a suiting weight woven silk.  (You can't tell from the posts to this blog so far but I do alot of garment sewing so I have lots of apparel fabrics on hand.)  I loved the texture and glow that the silk fabric brought to the block so I went with it even though I think it is out of the norm to mix this type of fabric into a quilting project.  Here is my finished block:

I hand quilted the piece with simple straight stitches.  I used some silk embroidery floss to quilt the center circle and in the ditch between each petal.  I used a turquoise cotton embroidery floss to quilt the edge of the petals all around.  Here is the block in progress with my embroidery threads:
A detail of my "chunky" quilting stitches:

Oh, and the backing is just plain old muslin - since this project will hang on a wall or lay flat on a table I figured it would be okay to do a boring backing. 
Overall I am very pleased with this project and I'd like to make a grouping of these blocks in different sizes to hang on a wall all together.  I think it would make a fun, graphic display - maybe near our back entrance near the kitchen?  I'll add it to the list of projects that I now have underway including:  Vogue 1220 (a Donna Karan dress in sky blue shirting), Vogue 8673 (a cropped jacket in grey wool/cashmere blend), scarfs for my boys (in blue fleece backed with fabric from Moda's City Weekend line), 2 more baby bibs (an owl print and a coordinating stripe) and 3 cross stitched dolls for my daughter.  There are not enough hours in the day!  However, my wonderful husband took care of the laundry this past weekend so I could stitch my dresden plate.   I'm a lucky woman people!

Wednesday, March 2, 2011

Free Baby Bib Sewing Pattern and Tuturial

When I was in NYC a couple of weeks ago I saw these gorgeous kits to make baby bibs that came with Liberty fabrics.  I decided to spend my $35 on a whole yard of the Liberty and draft my own simple bib pattern instead.  I'm posting the pattern at the end of this blog entry as a little present for any visitors who happen to be reading my very new blog.  It is a very simple, classice bib pattern.  If you print my pattern and make some bibs please post a comment and let me know how the pattern worked for you and what improvements you'd suggest.  Here is the first draft of the pattern which I designed to be cut on the fold. 


After sewing up a sample bib from the draft pattern I decided to make some improvements.  The second draft of the pattern (which is the version available for you to download) has a slightly larger neck hole and is drafted in a single whole pattern piece so you won't be cutting on the fold.  This bib is a simple project, great for a beginner.  It fits my 14 month old daughter as well as my 40 pound, 2 year old, giant hulk of a boy.  I've included instructions with the pattern in the pdf file below.  Here are a couple of bibs I made for my daughter with the final pattern (using fabrics from Valori Wells' Delhi line.)


You can dowload and print the pattern and istructions below.  Note that I drafted this pattern without the benefit of any special software - just a sharpie and some printer paper - it is not fancy but it will work for you.  Ok, so if you do make up this bib be sure to post a comment or send a picture!
- Liz

Three City Mice Bib Pattern